


The most ignored part of beauty routines and care is the manicure section. Focusing all the resources on face and hair, the well-being of the nails are often forgotten and to remedy that situation, DIY manicure regimens are widely available with intricate details which help procure the steps of a manicure at home easily. A simple process that does not take much time and is affordable is the much sought after one. For beginners, below listed are the steps and ingredient and instruments required for a DIY manicure.
 |
| How to do a Professional Manicure |
Things Required:
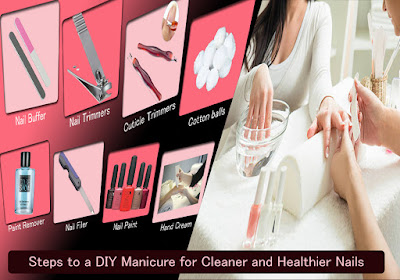
Setting out with all the required types of equipment and ingredients is the right way to begin the process. The essential products required for a manicure at home are...
• Nail buffer,
• Nail trimmers,
• Cuticle trimmers,
• Cotton balls,
• Paint remover,
• Nail file,
• Good quality nail paint,
• Hand cream,
• Base coat and
• Top coat.
After you have gathered all the necessary tools for this task, follow the 10 step procedure to get clean and healthy nails.
Steps to get the Perfect Manicure at Home:
It is essential to place the tools on a flat surface and remove all things and be careful to avoid spills and smudges, as nail paint can spoil fabric and wood finish alike. Remove all hand accessories and use a scrap paper as the base of the surface, also be extra careful of not spoiling your clothes.
1. Remove Nail Paint —
Using a non-acetone paint remover and cotton pads, you can remove all traces of the old nail paint gently. Putting the remover solution on the cotton ball, apply it to the nails. In case, the paint is rigid on the nails, place the cotton balls on the nails for a while to remove the paint. Non-acetone removers will help to not dry out the skin around the nails and are convenient to use.
2. Clip and File Nails —
To trim the nails, use the nail trimmer but make sure that you do not clip and file them too short to style later. A straight or cone shape are the classics, but you are free to experiment with the shape of your nails as per your convenience. Knowing the correct way to file your nails can determine the beauty of your hands. Thus, extra care is to be indulged on this task. Creating smooth curves from all angles and refraining from breaking the nails is essential. Use a nail buffer to give them a smoother surface, but do not buff them too hard as it can weaken the nails.
3. Soak your Nails —
Soak your nails in a bowl of warm water with an added mild cleanser to rid them of dirt and dead skin. This step cleans the surface and softens the cuticles to ensure a smooth application. For fragile nails, this step is to be avoided, rinse them off in such situations. You can use this step to exfoliate your hands and the corner of your nails to give it a cleaner look.
4. Shaping Cuticles –
Pushing back the cuticles are a sensitive task. Be careful not to make them vulnerable. Messaging some cuticle cream before prepping them can help. Pushing back gently is recommended as applying to much pressure can damage the nails.
5.Hand Moisturizer –
This step ensures that the skin around the nails is adequately moisturized and helps avoid smudges later on. Use a great cream to give your hand a message and relax, focusing mainly on the skin around your nails and fingers.
6. Apply Base Coat and Nail Paint –
Applying the base coat makes the nail paint long lasting as it gives it something to adhere to and also provides a cleaner finish of the application with almost no spill-over and smudges on the skin. As for applying the nail paint, choose a good quality nail paint of your preferred color or even mix up two colors to create an exciting look and apply them carefully in one swift brush stroke at a uniform direction. A thin base coat followed by a top coat is finished off with a clear polish application to complete the look. But before you apply one layer atop the other, make sure the previous layer is dried up.
7. Moisturize –
In case of extremely dry hands, moisturizing frequently leads to healthy nails and skin. After finishing up the process, a thin layer of moisturizer can be applied to rid the smell of the chemicals and to keep the nails in good condition.
Following these necessary steps to achieve a healthy look for your nails are helpful, but you can add more levels as per your requirements. The central goal is to keep your nails clean and healthy, and this process of a manicure at home does cater to that need apply. Repeat the steps twice a month to have impeccable skin and nails.


No comments:
Post a Comment